Tag: share

  • MonoMIDI – MIDI clip sequencing

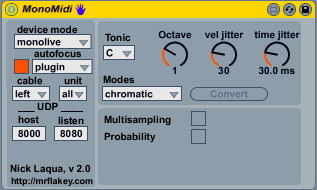
    MonoMIDI is a step sequencer to be controlled via the monome. It’s  based on manipulating Live MIDI clips, rather than using live.step or other means. So in my opinion, it fits the workflow better where one might use a keyboard next to a monome or an MPC.

    Part of the code base was  taken from the Ableton Clip Step sequencer, thx for that. Unfortunately, the monome isn’t recognized as a control surface by Live which was one of the reasons for  developing it.

    The features in a nutshell:

    • support for MIDI clips with up to 64 steps (1 step = 1/16 note, which makes it 4 bars) and 49 drum pads (or 7 octaves when using scales)
    • Full scale support including chromatic mapping and other custom scales
    • Scale conversion
    • advanced duplication facilities for partial note sequences
    • multisample mode (device chooses out of 8 samples based on weighted probability)
    • MIDI clip navigation mode
    • extensive humanization options (velocity and timing randomisations)
    • Adjustable note length
    • Playhead visualisation
    • works standalone and integrated into MonoLive

    The detailed documentation can be found below, as well as the device.

    enjoy, nick

    Download

    MonoMidi.amxd (v2)

    monomidi_docu (v2)

  • MonoLive 2 – all in one

    As already announced some time ago, I didn’t particularly like the complexity of the MonoLive suite which would require at least one device per track to be controlled by the monome.

    As a result, there is the next version of MonoLive which combines all track based functions in one single device while it still allows to plug-in additional devices which would require the whole monome real estate (such as MonoParaSteppa or MonoMIDI…stay tuned for that).

    In addition, it enables the monome to act as a control surface allowing you to select any device within your live set and to control its first 8 parameters (hint: use racks to expose the parameters you like). and there is more, just have a look at the documentation link below.

    have fun, nick

    Downloads

    MonoLive.amxd (v1.1)

    monolive documentation (v1.1)


  • MonoParaSteppa update: Parameter recall

    As requested by quite a lot of people, I added the ability to store parameter assignments within live sets, which are now recalled at load time. All the other device settings including the actual sequences are stored as well.

    In addition, just a heads up that pretty soon, there will be new versions of MonoLive (clip launcher) and MonoMIDI (clip based step sequencer) with quite some exciting features, such as:

    • MonoLive is now a self contained device, no need to put satellite devices onto the individual tracks
    • Support for device control….any device within the set can be chosen to be controlled with the monome (the first 8 parameters, that is)
    • Better integration of external devices such as MonoMIDI or MonoParaSteppa into MonoLive routing app (but devices can also be used standalone)
    • MonoMIDI supports scales now (besides chromatic mode), including scale transformation
    • Partial sequences can be duplicated across the whole clip via monome
    • MonoMIDI doesn’t require an additional device to be used anymore.

    and there is more, so stay tuned.

    download

    MonoParaSteppa.amxd (v1.2)


  • More modulation madness

    Fresh off the press, there is another update to MonoParaSteppa which brings some quite interesting new features. First of all, the device drop down now includes the Track Mixer which allows you to modulate Track volume, Panning, all of the Sends as well as – in case of inserting the device into the master track – the Cue volume (not sure that’s needed) and the crossfader.

    In addition to that, version 1.1 introduces using any waveform as modulation sequence, just drag a .wav or .aiff file onto the respective device section, and the waveform will be mapped onto the sequence. A sine, square and triangle waveform is already included and can be accessed via the action menu (the three bottom entries). It works quite smooth with increasing the step number to 64 and using glide 2 mode. The loop braces of the step object give you even more control which section of the waveform is used for modulation.

    The other new thing is the introduction of the MonoParaSteppaMidi device which is an (almost) exact replica of the MonoParaSteppa one. So why the hell another device ?  There is one important difference, while the original device sports a beat detection mode (based on transient analysis), the steps of the MIDI device can be triggered via note-on’s which opens quite some new options as well.

    Download

    MonoParaSteppa.amxd (v1.1)

    MonoParaSteppaMidi.amxd (v1.1)

  • Update: MonoParaSteppa v1 – more goodies

    After some positive feedback for the beta version of MonoParaSteppa, there is an update for the parameter modulation device. Besides bugfixing, the main changes are the introduction of a beat detection mode and more extensive monome support.

    With Beat detection, a new modulation step is executed upon detection of a beat. Of course, this can be adjusted per parameter and allows for activation of audio or midi devices which need explicit triggering (e.g. stutter effects). The sensitivity of the beat detection algorithm can be adjusted globally by setting the minimum velocity (the slider in the left section, below UDP settings). Beat detection mode itself can be activated with the toggle on the right side of each parameter area.

    The other changes are mainly related how the device can be controlled with the monome. There are four different modes now which are all activated with button 1 of the control row (row 8):

    1. Sequence Mode (default mode, no LED)
    2. Function Mode (short press, LED is on)
    3. Value Mode (button press longer than 1/2 sec, slow blink)
    4. Range Mode (button press longer than 2 secs, fast blink)

    In Sequence mode, all 6 sequences can be edited directly on the monome. Changes in the device are reflected as well, and all monome sizes are supported (you might need to adjust the step length to take advantage of a 128 or 256). The sequence to be shown can be chosen with buttons 3-8 of the bottom row (control row).

    In all remaining modes,all parameter/sequences is represented by columns 3-8. In Function Mode, it is possible to alter the sequence drastically. The buttons of each column are mapped to the following actions (in order).

    • up: move the whole sequence up by 1
    • down: move the whole sequence down by 1
    • sort asc: sort the sequence ascending
    • sort desc: sort the sequence descending
    • scramble: change the order of the sequence steps randomly
    • random: generate a random sequence
    • continous random: generate continously random values
    • random timing: use random timing intervals between steps

    In Value Mode, each column displays the current value of the parameter whether the sequencer is running or not. If not, you can change the parameter value manually via buttons 1-7 of each column. The buttons of the control row can be used to start/stop the sequencer.

    In Range Mode, the modulation range (the range which the parameter value can have) can be adjusted per parameter via buttons 1-7 of each column. In order to define whether one wants to adjust the min or the max amout, the buttons of the control row can be used. If not pressed, the lower boundary will be adjusted when pressing a button within the respective column, if keeping the bottom row button pressed, the upper boundary will be adjusted.

    Please note that for the beat detection mode, the max external bonk~ is required which can be downloaded here (for Mac) and here (for Windows). For Mac, it is included within the frozen device, so you guys don’t need to worry.

    For now, the only things left to be done (beside any interesting suggestions from you guys) is “ticking the documentation box” and introducing the ability to recall parameter assignments. So stay tuned !

    Download

    MonoParaSteppa.amxd
  • MonoParaSteppa – take control of your devices

    One thing missing from MonoLive so far was the ability to control devices and their parameters via Monome. There are already quite some good M4L devices floating around such as the Single Parameter Sequencer or the 3X Parameter Sequencer, but none to be controlled via a monome.

    So I made my own (partially based on the second one above, thx Ivehon), and now it’s become quite a beast. Besides adding monome support, the idea was to make it work standalone as well (without using the whole MonoLive framework), and to add “some” randomness to it. Mission accomplished.

    Main features:

    • controllable via Monome or without
    • Step Sequencer Control of up to 6 device parameters and up to 64 steps
    • Random timing between steps
    • Continous-random mode
    • Timing multiplier for longer intervals up to 32 bars
    • Quantization setting
    • 2 Glide modes (fast and slow)
    • Full synchronisation between device and monome
    • Multiple sequencer directions
    • Randomisation of step intervals, quantization and time multiplier

    In terms of monome control, the device supports three modes which can switched via the button 1 of the bottom row (control row). The default mode (no LED) allows you to select the respective parameter with button 3-8. The respective sequence will be displayed and can be changed with the buttons of row 1-7.

    In Change mode (press button 1 shortly, will be lit), buttons 3-8 are assigned with the following functions (which can also be executed via mouse directly in Live):

    Up: raises the step values for the whole sequence

    Down: lowers the step values for the whole sequence

    Sort 1: Sort the sequence ascending

    Sort -1: Sort the sequence descending

    Scramble: Randomize the order of the sequence

    Random: Generate a random sequence

    In Current Mode (keep button 1 pressed for half a second, LED will blink), buttons 3-7 of the control row 8 represent the 6 parameter sequences and allow you to start/stop each sequence. If the sequencer for the respective parameter is running, the LED will be lit. The columns 3-8 above the control row will show the current value of the parameter as it is being modulated via the sequencer. If the sequencer is not running, you can modify the value for the respective parameter manually. This allows for mixing automatic modulation with live changes.

    As usual, it’s the first shot (v0.9), so let me know what does and does not work, and sorry for the (as of yet) nonexisting documentation, I will work on it.

    Download

    MonoParaSteppa.amxd

  • Update: dschihadelay v1 – a (better) glitch delay

    Probably the last update for 2009, after some sleep and feedback as well, there is a new version of dschihadelay.

    Besides fixing some bugs (synchronisation, randomisation and panning), the device is now fully truly stereo, meaning that both input channels get processed. For modulation purposes, the boundaries for the different ranges (delay time, feedback amount, filter cutoff) can now be automated with Live due to introduction of the Live UI dials (designated “min” and “max”).

    In terms of the signal path, you can choose either to use a mixed wet/dry signal or only the wet portion of the sound via the “Mixed” switch. The Filter can be placed in two positions, either within the feedback loop (“Inside” switch), behind the delay unit (“Post” switch).Of course, you can use both of them as well.

    Please be careful with the resonance settings, especially when activating the filter within the feedback loop.

    Download

    dschihadelay.amxd v1


  • dschihadelay – a glitch delay

    When cleaning up my laptop, I came across monohad a former project of mine where I embarked on porting the Apparat performance patch dschihad to Max5 while enabling it to be used with the monome. Eventually, I abandoned (or should I say “paused”) the project when the patch got too big and too resource-hungry.

    Still, there are some goodies in the code, so I just took the random delay section and made that little m4l audio device. Essentially, it is a random delay with random feedback, random filter cutoff and random panning. quite some randomness, so I suggest to put a limiter behind it, otherwise you might risk your expensive gear.

    In more detail, it is a single-tap delay unit with random delay times (the range can be chosen) which is synced to the Live transport with a variable frequency. The range for the feedback amount as well as the range for the filter cutoff can be chosen using the two sliders. It also allows to freeze the feedback, in that case, a limiter would be essential.

    The toggles on the left hand side switch off the different parts of the device (feedback, filter, panning). Please note that for now, only the left input channel is processed. If anyone is interested, I might change that to stereo mode.

    Download

    dschihadelay.amxd

  • Update: MonoMIDI 1.0

    There is an update coming your way, mainly centered around MonoMIDI. It now supports a Multisampling Mode which makes your drum sequences even more humanized by choosing samples out of a pool of 8 for each note lane. It is best to be used with a Drum Rack.

    For each of the samples within the pool, one can define the relative probabilities for that sample to be chosen which allows you to create dynamic sequences in realtime just by changing the probabilities.

    Apart from that, MonoMIDI now also sports a Probability mode where the velocity of a note is used as a means for the probability that the note will be played. Low velocity = low probality.

    I also fixed a bug with the MIDI transpose which would lose note-offs when transposing during an open note.

    MonoMIDI 1.0 requires MonoInterface 1.0. See here for the other devices.

    Download
    MonoMIDI 1.0

  • MonoLive – Monome for Live

    monome

    Since the release of Ableton Live 8, there has been quite a buzz around Max4Live, the common project of Ableton and Cycling’74. By integrating the powerful Max/MSP/Jitter platform, the promise was to actually enable the users to extend Live with MIDI and audio effects, virtual instruments, customized control surfaces, video playback devices………..

    After a rather long beta phase, it has finally surfaced on 23rd november, and it seems to be a pretty good job. Particularly pleasing for owners of the “new kids on the block” in the Live controller world Launch Pad and APC 40 who are just waiting to put those user modes to work.

    In order for my beloved monome 64 not to be left behind, I made a set of devices which will allow you to make the little 8×8 controller your one-stop shop for controlling Live.

    MonoLive consists of four devices:

    • MonoInterface is the central hub communicating with the controller and the other devices
    • MonoMidi allows you to control a Live MIDI track (clip launch, solo/mute, EQ settings), including MIDI Editing for drum sequencing, patterns and arpeggios with up to 64 steps
    • MonoAudio puts you in control of a Live Audio track (clip launch, solo/mute, EQ settings) as well as controlling the loop length a la Traktor.
    • MonoBufferShuffler is based on the factory BufferShuffler device but has been enhanced to allow controlling it via the monome. The standard functionalities such as clip launch.

    In addition to those features, MonoLive can do a little bit more:

    • Support of up to 5 return tracks for bus effects
    • Support of up to 7 FX tracks for modulation of the audio stream
    • Transposition up/down
    • Smooth transition of send values and EQ settings over time.
    • Clip overview mode to support up to 49 tracks with 64 scenes
    • MIDI overview mode to support MIDI clips over 4 octaves and 64 steps
    • Optional Tempo tilt
    • MIDI humanisation mode

    The documentation is included with the devices, just download below and start pushing some buttons. I also provided a demo LivePack based on the free Swayzak LivePack available on the Ableton site.

    Have fun and let me know how it goes…..
    Download

    MonoLive v0.91 (update without using 3rd party externals)
    MonoLive Demo LivePack